Sculpting the Originals and Making Molds of the RFK Jr. & Nicole Shanahan Sculptures
I personally generally sculpt prototypes - the original model of a sculpture out of the popular oven-bakable polymer clay 'Sculpey' or with related polymer clay products. though as described in more depth below I build this clay upon a metal wire, and often also tin-foil core armature. I sculpt and bake several times - first building the basic shape - and then getting into more precise details as things progress. Ultimately I use a two-part hardening sculptural epoxy to fine tune the last details.
Then when the original is looking pretty good a two-part mold is made with a two-part silicon mold material as well as other form of silicon. And finally an outer 'shell' of fiberglass-mesh reinforced architectural plaster is used to help maintain and hold the form of the inner flexible silicon rubber mold.
I don't have pictures of all of the process right now - but at least the below examples will help illustrate some of the key parts of the process :)
Sculpting the Bust of RFK Jr.
Wire Armature &
Bulking Materials
Basically though I generally start out with a medium thick metal wire to make an armature support of something like what i think the final shape of the sculpture will be like - then I add pieces of cement and other solid object to help fill the space - and then wrap all that with thinner metal wire - like floral wire to hold it all in place.
This initial armature core gives both an initial structure to sculpt and press into and saves money on clay - as this oven-bake clay - Sculptey (TM) generally - gets a bit expensive as sculptures tend to grow to sizes larger than I'd usually intended.

The really waayyy early stage of sculpting. Do you see the resemblance?
Here you can see the wire armature and a bit of compressed tinfoil sticking through the first layer of basic Sculpey clay.
First Bit of Clay and First Baking
The wire-based armature is then covered with an initial amount of lower cost 'basic' or original Sculptey or similar product - to reinforce and ultimately hold the wrapped and twisted wire in place. Then this first layer of oven-bakable clay is... baked. i think it's like 375-degrees for around 15 minutes.
Next some of the more final sculpture can begin - using the higher grade 'Super-Sculptey' or such.

A little further along.
I generally start with the front of the head - the face - as that's what matters most in the end when attempting to sculpt the likeness of someone.
Then other portions of the head can be sculpted to match the proportions and general size established by how the face turns out.


Starting to get handsome..

But the back of the head is still a very different story...
- I'm not gonna say anything about tinfoil hats - or the evidence that aluminum is pretty definitely the main cause of modern neurological & immune issues - but hey it's one way to put used clean burrito wrappers to an additional use.

RFK Jr. bust - after most of his face has
been sculpted - starting to work on the
shoulders-body portion. You can see that
the head area has been baked - while the
lower area is still soft and being modeled.

RFK Jr. bust - another image-perspective of the same phase as before. At this point there's probably already been 4 or 5 baking phases - the core, front, 2 sides, back and core base.
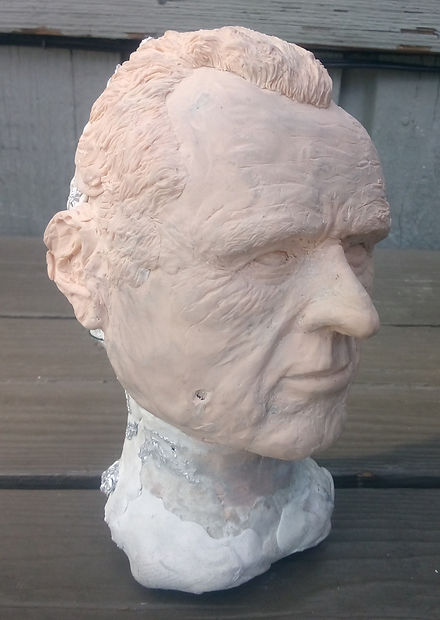
After I've gotten the sculpture to near as complete as I can manage with the bakeable clay I start to fine-tune details and make more subtle corrections with a two-part sculptural epoxy - in this case I use Magic-Sculpt(TM) - which i think is actually commonly used in taxidermy - for noses and such I'm guessing.
There's always some imperfections left over from baking. For one thing when the statue is laid down in the oven parts of one side will get flattened or otherwise damaged. the epoxy is also a bit more resistant in a manner that allows for more precise details to be sculpted. as the epoxy gradually hardens over a half-hour or so more and more exact detail can be locked in. So beyond structural refinements to the face, hair and other areas the epoxy is great for making the shirt-collar buttons and the eye pupils and such.

Here the base-shoulders has been pretty well finished and some touch up with two-part sculptural epoxy has begun - the grayish areas. You can see it's been used to make the iris and pupil defined too.


Developing the Nicole Sculpture
In this case there's a few more pictures
of the middle early phases of the sculpture.

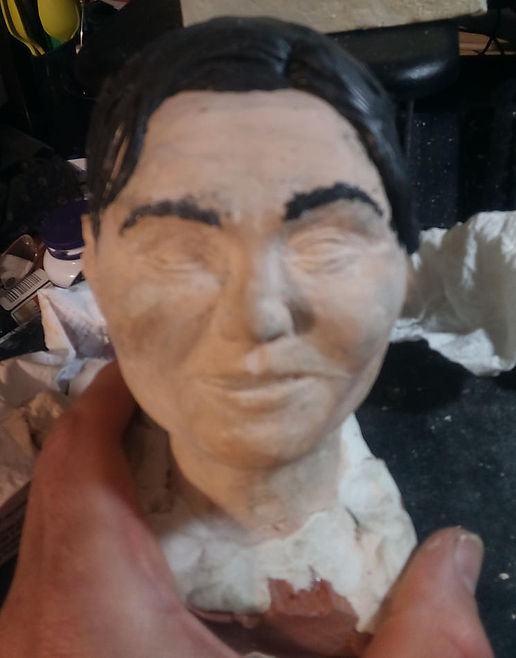
As you can see the early stages of the sculpture can look nothing like the real person - just getting a very rough approximation of human face shape.

Starting to get a bit closer...


In the case of the sculpture of Nicole I was running out of monotone Sculpey so used other shades that gave me an approximation of skin and hair looks.


Here you can see that the Sculpey stages of the prototype has already been completed and now the epoxy is being used to fine-tune her hair, teeth, etc.
[ please ignore my random supplements and such in the background : ) ]
Making the Molds

I've gotta prioritize other portions of the website at the moment - but for now - here's a few initial images from the silicon mold-making process.
I make silicone molds in two pieces - generally a front and back piece - which meet at the middle of each side.
I try to conform the 'seam' line between the two mold halves with features of the sculpture that will help to obscure any seam in the final casting.

The gray-colored material you can see around the sculpture of RFK Jr in the image here is regular 'plasticene' non-hardening clay - the type that many of us got to play with as kids and that was commonly used in stop-motion 'claymation' back in the days before abundant digital animation.
The gray plasticene clay is being used as a 'frame' or 'moat' to hold the silicon material- the first layer of which will be poured on in liquid form. That's why there's a bit of a 'wall' at the outer edges of the clay.
This photo was a bit over-exposed but you can probably still see the indentation patterns within the gray clay - that will ultimately make nub-like lines which will act as alignment or 'locking' shapes between the two mold halves.
The cardboard glued to the base is also to keep the silicone from flowing out.
Here you can see the first coat of the two part silicon material has started to be poured on to make the front half of the mold for the RFK Jr. bust.
I stopped mid-way to take the photo, but the blue liquid will ultimately fill the entire 'moat' area of the clay mold-retainer.
The silicon is made from two parts - a wide thick solution at a nine-to one ratio of a deep blue liquid - making the light blue you see in the mixed and poured material. You can see the bottle of the blue liquid half in the background of this image.
I don't know whether Harrison Ford prepared Bobby for this experience back in their RiverKeeper days.
Although there's not images of it in this case - for the next stage, after the initial liquid blue layer of silicon - I've actually taken to using regular 100% silicon caulking, such as you'd use to fill gaps around a bathroom tub or sink. This allows me to build the mold more thickly and adjust the shape that i want it to form into. Because the blue liquid flows in and settles primarily to the deeper areas - I'd have to use a whole lot of it - essentially creating a big blue 'block' of silicon around the sculpture - which would be both quite expensive and extremely heavy to use in the actual casting process.
A mold needs to be around at least 1/2 inch thick - so that it will hold its shape well and be relatively durable - so the silicone caulking allows me to more quickly and affordably build up a mold of these dimensions. And recently I've taken to mixing cornstarch in with the caulking with accelerates the process considerably - but really puts off some strong acetic acid (vinegar) fumes in the process.


Here the sculptures of Bobby as well as Nicole are being prepared for the pouring of the first coat of the back half of their silicone mold. You can just barely see the white plaster shell around the front half of the mold - as a new plasticene clay containment has been built upon it.
The blue inside of the front half of the mold is visible although some Vaseline(TM) has been smeared all over it in order to (hopefully) prevent the two silicone mold halves from sticking together. (was only semi-successful at that in this case : ( )
In this image - to the left - you can see that a bit of silicone caulking has begun to be build up upon the initial blue layer of silicon. It'll cover the whole area. And after it's adequately dried a second similar layer will be built up on top of it. Usually takes at least a day or two for all of the necessary drying time.


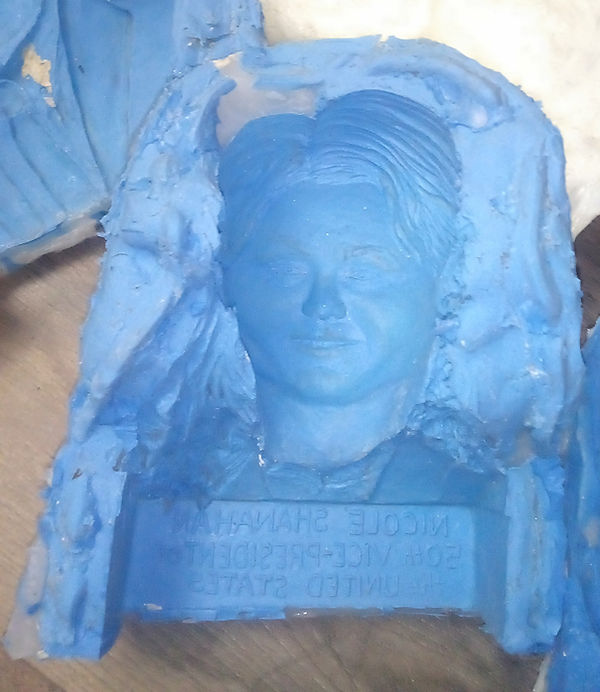
A close-up of the inside of the Nicole mold.

Preparing the first RFK Jr. bust version for mold-pouring - first side
